How to Create a Custom Tag in Google Tag Manager
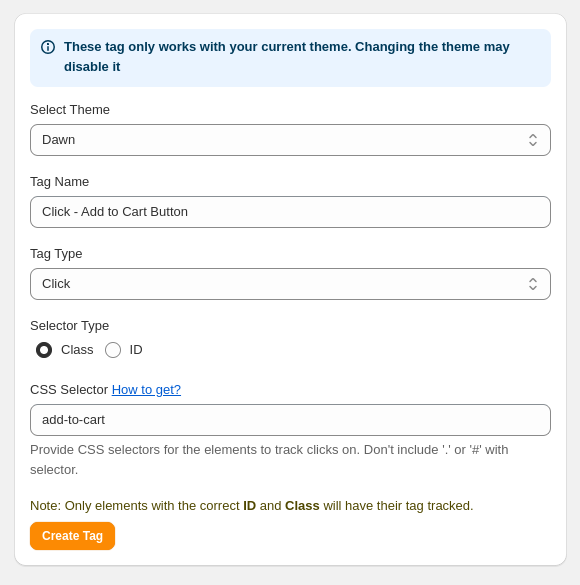
Creating custom tags in Google Tag Manager (GTM) can be beneficial for tracking specific events on your website, such as clicks, form submissions, or user interactions with various elements. This guide will walk you through the process of setting up a custom tag using the form shown in the image.
1. Select Theme
- Field: Select Theme
- Options: This dropdown lets you choose the active theme for which you want to create a tag.
- Purpose: Tags created through this form are designed to work with your current theme only. If you switch themes, the tag may no longer be valid, as elements and CSS selectors may change.
Tip: Be sure to select the correct theme to avoid issues with tracking. If you change the theme in the future, you may need to recreate or adjust the tags.

2. Tag Name
- Field: Select Name
- Input: Enter a descriptive name for your tag, such as "Add to Cart Button Click" or "Newsletter Signup Form Submission."
- Purpose: This name helps you identify the tag in GTM, especially if you have multiple tags.
Tip: Use a naming convention that includes the action and the element, like "Click - Add to Cart" or "Form Submission - Contact Us," to keep your tags organized.

3. Tag Type
- Field: Select Type
- Options: This dropdown allows
you to select the type of interaction you want to track. Common types
include:
- Click: Tracks clicks on specific elements.
- Page View: Tracks page views.
- Form Submission: Tracks form submissions
- Purpose: Selecting the appropriate tag type ensures that GTM accurately records the interactions you want to track.
Tip: For tracking clicks on buttons or links, select "Click." For tracking forms, choose "Form Submission." Use the type that best matches your tracking needs.

4. Selector Type
- Field: Select Type
- Options:
- Class: Tracks elements with a specific CSS class.
- ID: Tracks elements with a specific ID.
- Purpose: This field lets you define the CSS selector type to target the element you want to track.
Tip: Use ID if you are tracking a unique element on the page (like a single button). Use Class if you want to track multiple elements with the same styling across the page (e.g., buttons with the same class name).

5. CSS Selector
- Field: CSS Selector
- Input: Enter the class or ID of the element you wish to track.
- Instructions:
- Class Selector: f you select "Class" as the selector type, enter the class name without the . (dot) prefix. For example, if the class is .btn-submit, enter btn-submit.
- ID Selector: If you select "ID" as the selector type, enter the ID without the # (hash) prefix. For example, if the ID is #submit-button, enter submit-button.
- Purpose: The CSS Selector tells GTM which element(s) on the page to monitor for interactions.
Tip: Use specific selectors to avoid unintended tracking. If you are unsure of the CSS selector, you can right-click the element on your page, select "Inspect," and identify its class or ID in the HTML.

6. Create Tag
Once you’ve filled out the fields, click the Create Tag button to save your custom tag. After you create the tag, it will be configured in GTM with the parameters you specified in this form. You may need to publish or preview the tag in GTM to verify that it’s working as expected.
Example:
Creating a Tag to Track an "Add to Cart" Button Click Let’s walk through an example of creating a custom tag to track clicks on an "Add to Cart" button.
- Select Theme: Choose the theme you’re currently using, such as "Dawn."
- Tag Name: Enter "Click - Add to Cart Button."
- Tag Type: Select "Click" to track user clicks.
- Selector Type: Choose "Class" if the button uses a common class, or "ID" if it has a unique identifier.
- CSS Selector:
If you chose "Class" and the button has the class .add-to-cart, enter
add-to-cart.
If you chose "ID" and the button has the ID #addToCart, enter addToCart. - Create Tag:
Click Create Tag.
After creating the tag, preview it in GTM to ensure it’s tracking the "Add to Cart" button clicks accurately.

Additional Tips
- Testing: Use GTM’s preview mode to test your tags before publishing them to ensure they’re firing as expected.
- Avoid Overlapping Tags: If you have multiple tags for the same element, ensure they don’t conflict by using unique tag names and selectors.
- Monitoring: After publishing, monitor the tag’s performance in Google Analytics to verify it’s tracking data correctly.
This process provides a straightforward way to create custom tags, allowing for precise tracking of specific user interactions on your site. With custom tags, you gain more control over your analytics and insights, helping you make data-driven decisions to improve user experience.
 Purpose
 App
Architecture
 CONSENT MODE
 Requirements
 AD BLOCKER
 Google
Analytics 4
 Facebook/meta conversions API
 Google
Ads
 TWITTER
 Hotjar
 klaviyo
.png) Linkedin
Linkedin.png) Pinterest
Pinterest  Outbrain
 .png) Reddit
Reddit .png) Quora
Quora